tohokuaikiのチラシの裏

技術的ネタとか。

今更だけど、EthnaをPHP7にしてmysqliに対応した時のメモ

昔のコードのメンテナンスです(とか言ってみる

いい加減PHPも7になってEthnaはねーんじゃないの?って感じなのですが、これがまた意外と動くので使い続けたりしています。

ただ、preg_replaceのe修正子とmysql*系の関数が無くなったのでmysqli*に対応しないといけなくて、そのメモです。ちなみに、Ethna.phpをみると

/** バージョン定義 */
define('ETHNA_VERSION', '2.5.0-preview3');

とか書かれてたりします。

やらないといけないこと

  • preg_replaceのe修正子の削除
  • mysqliの適応
  • =&を=にする。(これは一括置換とか使って)

以下コードの羅列です。

etc/*****-ini.php

<?php
     'dsn' => 'mysql://user:pass@localhost/db_name',

 ↓

<?php
     'dsn' => 'mysqli://user:pass@localhost/db_name',

DB/Ethna_DB_PEAR.php

<?php

    function getInsertId()
    {
        if ($this->isValid() == false) {
            return null;
        } else if ($this->type == 'mysql') {
            return mysql_insert_id($this->db->connection);
        } else if ($this->type == 'sqlite') {


     function isValid()
     {
          if (is_null($this->db)
             || is_resource($this->db->connection) == false) {


    function quoteIdentifier($identifier)
    {
        if (is_array($identifier)) {
            foreach (array_keys($identifier) as $key) {
                $identifier[$key] = $this->quoteIdentifier($identifier[$key]);
            }
            return $identifier;
        }
            
        switch ($this->type) {
        case 'mysql':
            $ret = '`' . $identifier . '`';
            break;


    function &getMetaData($table)
    {
        $def =& $this->db->tableInfo($table);
            /** 中略 **/
            // flags
            $def[$k]['flags'] = explode(' ', $def[$k]['flags']);
            switch ($this->type) {
            case 'mysql':

 ↓

<?php

    function getInsertId()
    {
        if ($this->isValid() == false) {
            return null;
        } else if ($this->type == 'mysql') {
            return mysql_insert_id($this->db->connection);
        } else if ($this->type == 'mysqli') {
            return mysqli_insert_id($this->db->connection);
        } else if ($this->type == 'sqlite') {

     /* mysqli_connectはresourceではなく、Objectなので */
     function isValid()
     {
          if (is_null($this->db)
             || (is_object($this->db->connection) == false && is_resource($this->db->connection) == false)) {


    function quoteIdentifier($identifier)
    {
        if (is_array($identifier)) {
            foreach (array_keys($identifier) as $key) {
                $identifier[$key] = $this->quoteIdentifier($identifier[$key]);
            }
            return $identifier;
        }
            
        switch ($this->type) {
        case 'mysql':
        case 'mysqli':
            $ret = '`' . $identifier . '`';
            break;

    function &getMetaData($table)
    {
        $def =& $this->db->tableInfo($table);
            /** 中略 **/
            // flags
            $def[$k]['flags'] = explode(' ', $def[$k]['flags']);
            switch ($this->type) {
            case 'mysql':
            case 'mysqli':

preg_replaceのe修正子対応

Ethna_Controller.php

まとめて書く。

<?php
         $postfix = preg_replace('/_(.)/e', "strtoupper('\$1')", ucfirst($action_name));
         $action_name = substr(preg_replace('/([A-Z])/e', "'_' . strtolower('\$1')", $target), 1);
         $r = preg_replace('/_(.)/e', "'/' . strtoupper('\$1')", ucfirst($action_name)) . '.' . $this->getExt('php');
         $postfix = preg_replace('/_(.)/e', "strtoupper('\$1')", ucfirst($forward_name));
         $r = preg_replace('/_(.)/e', "'/' . strtoupper('\$1')", ucfirst($forward_name)) . '.' . $this->getExt('php');

 ↓

<?php
         $postfix = preg_replace_callback('/_(.)/', function($m){ return strtoupper($m[1]);}, ucfirst($action_name));
         $action_name = substr(preg_replace_callback('/([A-Z])/', function($m){ return '_' . strtolower($m[1]);}, $target), 1);
         $r = preg_replace_callback('/_(.)/', function($m){ return '/' . strtoupper($m[1]); }, ucfirst($action_name)) . '.' . $this->getExt('php');
         $postfix = preg_replace_callback('/_(.)/', function($m){ return strtoupper($m[1]); }, ucfirst($forward_name));
         $r = preg_replace_callback('/_(.)/', function($m){ return '/' . strtoupper($m[1]); }, ucfirst($forward_name)). '.' . $this->getExt('php');
<?php
        $name = preg_replace('/_(.)/e', "strtoupper('\$1')", ucfirst($name));

 ↓

<?php
        if (preg_match_all('/_(.)/', ucfirst($name), $m)){
            foreach ($m[1] as &$v) $v = strtoupper($v);
            $name = str_replace($m[0], $m[1], ucfirst($name));
        }

Plugin/Cachemanager/Ethna_Plugin_Cachemanager_Localfile.php

<?php
    function _escape($string)
    {
        return preg_replace('/([^0-9A-Za-z_])/e', "sprintf('%%%02X', ord('\$1'))", $string);
    }

 ↓

<?php
    function _escape($string)
    {
        return preg_replace_callback('/([^0-9A-Za-z_])/', function($m){
            return sprintf('%%%02X', ord($m[1]));
        }, $string);
    }

Ethna_MailSender.php

<?php
                 $part['name'] = preg_replace('/([^\x00-\x7f]+)/e',
                     "Ethna_Util::encode_MIME('$1')", $part['name']); // XXX: rfc2231
                 $part['filename'] = preg_replace('/([^\x00-\x7f]+)/e',
                     "Ethna_Util::encode_MIME('$1')", $part['filename']);
              /* ... */
              $header[$i][] = preg_replace('/([^\x00-\x7f]+)/e', "Ethna_Util::encode_MIME('$1')", $value);

 ↓

<?php
                 if (preg_match_all('/([^\x00-\x7f]+)/', $part['name'], $m)){
                     foreach ($m[1] as &$v) $v = Ethna_Util::encode_MIME($v);
                     $part['name'] = str_replace($m[0], $m[1], $part['name']);
                 }
                 if (preg_match_all('/([^\x00-\x7f]+)/', $part['filename'], $m)){
                     foreach ($m[1] as &$v) $v = Ethna_Util::encode_MIME($v);
                     $part['filename'] = str_replace($m[0], $m[1], $part['filename']);
                 }
              /* ... */
              $header[$i][] = preg_replace_callback('/([^\x00-\x7f]+)/',function($m){ return Ethna_Util::encode_MIME($m[1]); }, $value);

Ethna_AppObject.php

<?php
         $table = preg_replace('/^([A-Z])/e', "strtolower('\$1')", $table);
         $table = preg_replace('/([A-Z])/e', "'_' . strtolower('\$1')", $table);

 ↓

<?php
         if (preg_match_all('/^([A-Z])/', $table, $m)){
             foreach ($m[1] as &$v) $v = strtolower($v);
             $table = str_replace($m[0], $m[1], $table);
         }
         if (preg_match_all('/([A-Z])/', $table, $m)){
             foreach ($m[1] as &$v) $v = "_" . strtolower($v);
             $table = str_replace($m[0], $m[1], $table);
         }

=& newをつぶす

find lib app -name "*php"|xargs -I{} sed -i -e "s/ = &new/ = new/" {}
find lib app -name "*php"|xargs -I{} sed -i -e "s/ =& new/ = new/" {}
またdebianのvsftpdでハマったのでメモ

環境

uname -a
Linux www 4.9.0-3-amd64 #1 SMP Debian 4.9.30-2+deb9u2 (2017-06-26) x86_64 GNU/Linux

いつものように、chrootしてバーチャルユーザーでのログイン。

症状1.

vsftpでつなごうとするとConnection Refusedされる。

ローカルからFTPコマンドでたたいても同じ。

$ ftp
ftp> open localhost
ftp: connect to address ::1: Connection refused
Trying 127.0.0.1...
ftp: connect: Connection refused

チェック項目

こんな感じで調べて何とかなった。

modprobeでモジュールチェック

# lsmod|grep ftp
nf_nat_ftp             16384  0
nf_nat                 28672  1 nf_nat_ftp
nf_conntrack_ftp       20480  1 nf_nat_ftp
nf_conntrack          114688  5 nf_conntrack_ftp,nf_conntrack_ipv4,nf_nat_ftp,xt_conntrack,nf_nat

これがなかったら以下を入れておく。

# modprobe nf_conntrack_ftp
# modprobe nf_nat_ftp

バーチャルユーザーのshell

とりあえずバーチャルユーザーの割り当てにはftp_userというユーザーを作ってたんだけど、これのshellが/usr/sbin/nologinだと動作しない。

vsftpd.conf

この2つは両立させられないらしいので、ipv6は使わないようにする。

listen=YES
listen_ipv6=NO

ホームディレクトリを555パーミッションに設定

こんな感じでバーチャルユーザーを設定していると、

# more /etc/vsftpd.d/vsftpd_user_conf/vftpuser
guest_username=vftpuser
local_root=/home/example

/home/exampleのパーミッションを555にしなければならない。

が、最近のVSFTPDだと

allow_writeable_chroot=YES

で行ける。

パッシブモードで引っかかる

このあたりでお勉強

FTPのアクティブモードとパッシブモード + vsftpdでの設定方法|A Day In The Boy's Life

centos - How to configure vsftpd to work with passive mode - Server Fault

どうもポートを開放しないとダメっぽい。あれー、今まで動いてたのになぁ・・・。

ということで、vsftpd.confに以下を記述。

pasv_enable=YES
pasv_min_port=61050
pasv_max_port=61100

で、iptablesをこんな感じで。192.168.xxx.xxxは自ホスト。

iptables -A INPUT -p tcp -s 0.0.0.0/0 -d 192.168.xxx.xxx --dport 61050:61100 -j ACCEPT
iptables -A OUTPUT -p tcp -s 192.168.xxx.xxx --sport 61050:61100 -d 0.0.0.0/0 -j ACCEPT

毎回何かしら引っかかるね。。。

PHPでeBayのAPIを使う

結論から言うと、APIのReferenceがあるけどそんなのは見なくてPHPSDKがあるからそれを使ったらすぐだった。

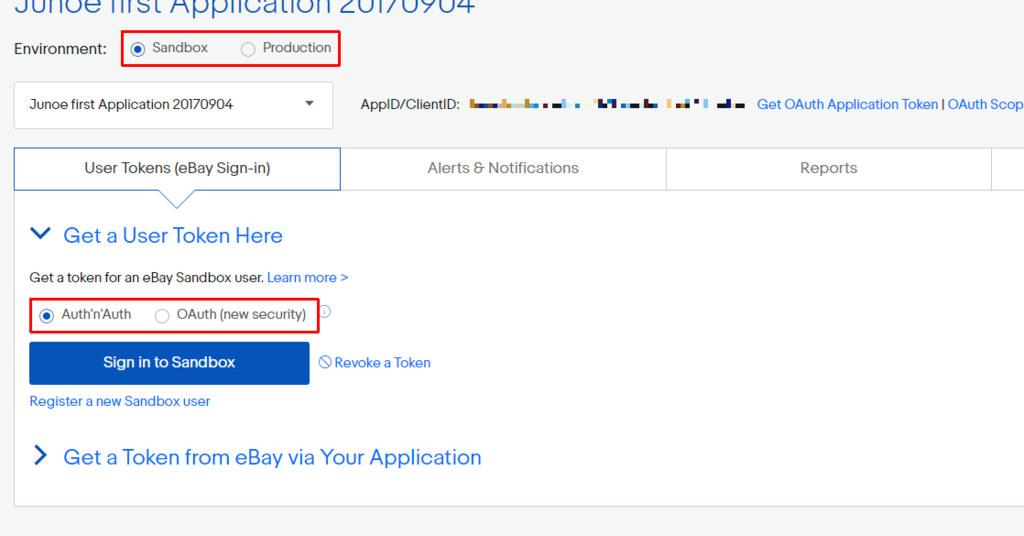
とにかく、SandboxとProductionの両方を行き来するのでどっちがどっちかわからなくなるし、いつの間にかアカウントできてたのでこの2つがリンクするというのはどういう風なんだろう?メールアドレスが同じものをSandboxとProductionの両方で使って登録すればいいのかしら?

わかんなくなったら、My eBayにそれぞれログインする。 * http://my.ebay.com:tilte=Production用 My eBay * Sandbox用 My eBay

eBay developerアカウントを作る

Sandbox用とproduction用の2つ作成。

どちらから作り始めてもいいのだけど、sandbox用は「testuser_」がPrefixになる。

正直、ごちゃごちゃとやってたら2個できたし、その2個がリンクしてるのはどうやって作るのかはわからない。

こっちに書いてあった、テスト用Sandboxユーザーの登録方法

eBay Features - Testing in the Sandbox

  • Set up an email account for each Sandbox test user. A unique email is required for each test user you create.
  • On the eBay Developers Program home page, either create a developer’s account by clicking the Register link or login by clicking the eBay Developer Login button.
  • Sign in as a developer, using your eBay Developers Program username and password.
  • Go to the eBay Sandbox User Registration Tool page.
  • Create your test user by filling in the Username and Password fields. You can leave the other fields as is. Click the Create User button.

アプリケーションを登録してキーを取得

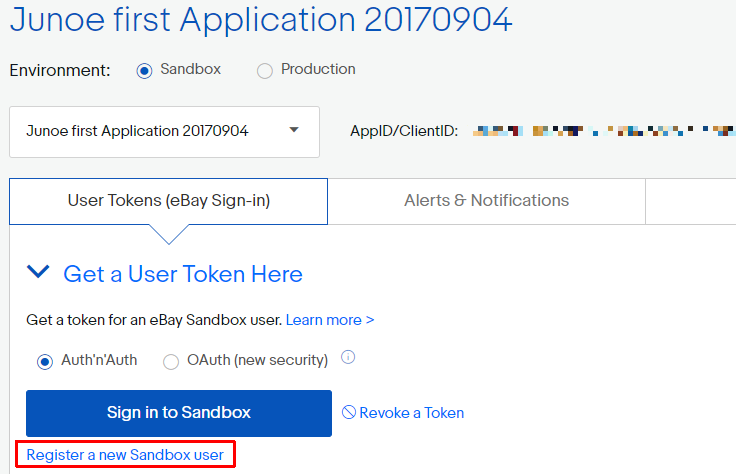
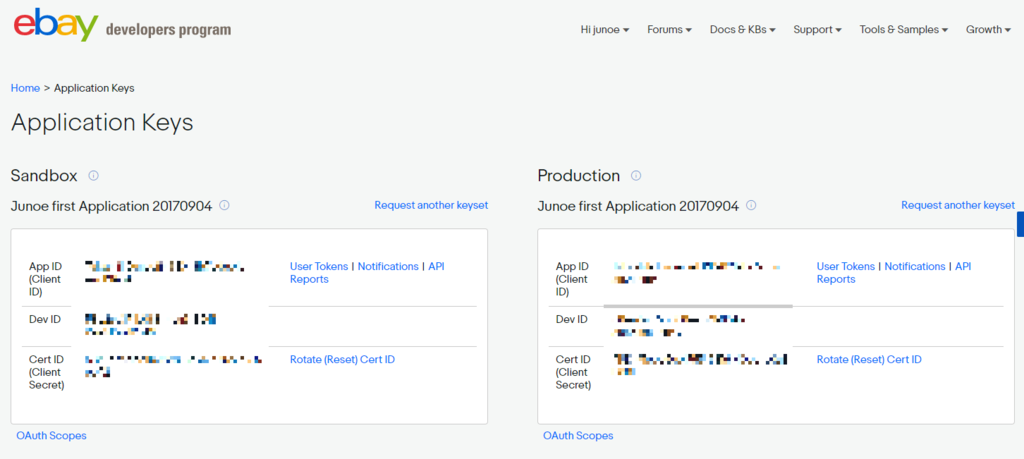
Applicationの名前を決めて、そのキーを取得 f:id:tohokuaiki:20170905183629p:plain

これも、SandboxとProductionの両方。

色々と求められるかもしれないけど、とりあえず携帯電話のSMSがあればなんとか突破できる。

Authトークンを取得

「Auth'n'Aut」と「hOAuth (new security)」と2つあるけど2つとも取得しておく。

f:id:tohokuaiki:20170905183906p:plain

この時、これでもかというくらいにログインをさせられるけど我慢する。

Return URLを登録

Authした時に返却されるURLとかプライバシーポリシーなんかのURLを登録しておく。別にeBayが後でクロールしてチェックとかはしないので適当なURLを入れておけばOK。

f:id:tohokuaiki:20170905184326p:plain

これも、当然SandboxとProductionの両方。

PHP eBay API SDKを取得

素晴らしいサイトから取得する。 devbay.net

面倒なので、githubから直接。
GitHub - davidtsadler/ebay-sdk-examples: Several examples of using the eBay SDK for PHP

composer.jsonがあるので、例によってcomposer installする。

ebay-sdk-examples/configuration.php の設定

大体見ればわかると思う。

ruNameというのが引っかかったのだけど、これは、Return URL Nameということで、先ほど登録してReturn URLの名称なのである。自分の場合、上のキャプチャ画面だとTakashi_ITOH-TakashiI-Junoef-fbnbhijtpとかいうのがそれにあたる。

sellerアカウントを設定

とりあえずこれで使えることは使える。Select系のAPIはProductionを使用する。登録系のAPIはSandboxを使用する。

登録系のAPIを使うにはSellerアカウントにしないといけない。

そのためのセットアップがここにある。Getting started selling on eBay

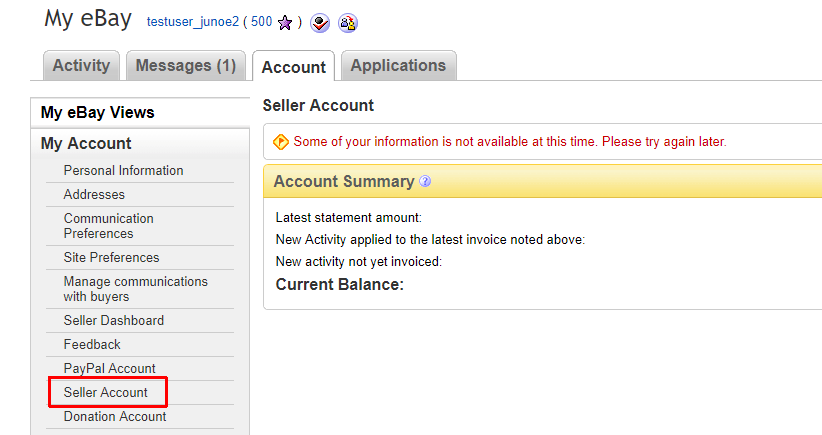
すると、My eBayのアカウントページで「Seller Account」というのが出てくるらしい。

f:id:tohokuaiki:20170905190806p:plain

で、これを当然のようにSandboxとProductionの両方で行う。

が、SandboxのSellerアカウントが設定できない・・・

上述のは、Productionの設定しか書いてなかった。いや、むしろテストするだけならSandboxの方だけで構わないのに、Productionの方だけSellerアカウントができてしまった。

Sandboxは登録しなくてもSellerテストできるんじゃん?って思ってSDKのサンプル商品登録を試してみたら

Error: You need to create a seller's account.
Before you can list this item we need some additional information to create a seller's account.

って出た。デスヨネー。

仕方ないのでSandboxのMy eBayに行くと How to Sell Items on eBay などと書いてあり、

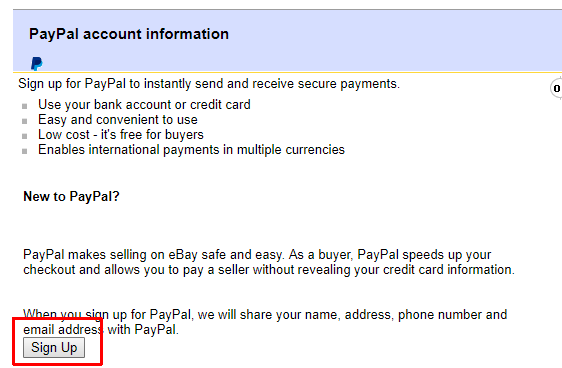
  • Sign up for PayPal (optional)
  • Fill out the Sell Your Item form

とある。optionalとあるPaypalの方は後回しにして、「go to the Sell Your Item form.」ってリンクをクリックするとリンク切れ。左のメニューにSeller Dashboardというのもあるのでそっちにヒントあるかな?と思ってクリックしたらリンク切れ。切れそう。

My eBay Viewsをシラミ潰す。

とにかくここに「Seller Account」というのが出ればいいのである。

f:id:tohokuaiki:20170905192629p:plain

しかし、PaypalにLinkさせればいいのかと思いきや、昔作って使えてたPaypalのアカウントがペンディングになっててダメだったり、新しくPaypalのSandboxユーザーで作ればいいんじゃないかと

f:id:tohokuaiki:20170906115646p:plain

ここのリンクから作ろうとしたら、PaypalのSandboxユーザー登録で電話番号がアメリカ形式じゃないとかZIPコードがお前の入力した住所と一致してないとかアメリカの電話番号・郵便番号の形式や実在するものを調べて入力したけどダメ。およそSandboxっぽくない。もちろん国をUSから変更することはできない。

困り果ててもう一度検索

もしかすると、作ったSandboxユーザーを「Sellerにする」という発想が間違っているのではないか?・・・すると、こんなページが見つかった。

eBay Features - Testing in the Sandbox

The process of registering a test user is different than that for registering a real user in the Production environment. After you register a Sandbox test user, you can use it to buy and sell test items in the eBay Sandbox.

買う用と売る用の2つのテストアカウントが必要ですよと。

なんだそんなの・・・売る用(Seller)アカウントが作れないから困ってるんだっていうの・・・と思いつつ、この画面のここからもう一つ作ってみる。

f:id:tohokuaiki:20170906120222p:plain

そして、新しいSandboxユーザーでログイン・・・・。

・・・なんかSellerアカウントになってるね。

f:id:tohokuaiki:20170906120524p:plain

で、Tokenを2つ発行して、configuration.phpに設定・・・

vagrant@debian:~/work/ebay/ebay-sdk-examples$ php trading/03-add-auction-item.php
The item was listed to the eBay Sandbox with the Item number 110222380931

おぉっ!!!できてる!!!ホンマ、なんつー、落とし穴やねん。。。

Confluenceのアドオンで別のアドオンのComponentを使う場合の注意

結論から言うと、その別のアドオンを事前にインストールしてないとインストールに失敗しますよということ。

お互いのComponentを循環参照するようなアドオンは作れないってことですね。

こんな簡単なことに気づかずにはまりました。

IDE上ではpom.xml

<dependency>
    <groupId>jp.example.confluence.plugins</groupId>
    <artifactId>foo</artifactId>
    <version>1.00.01</version>
    <scope>system</scope>
    <type>jar</type>
    <systemPath>${basedir}\foo-1.00.01.jar</systemPath>
</dependency>

って記述してたのでIDE自身はjarを見れていたので。

エラーの感じとしては

こんなのが出てた

Caused by: org.osgi.framework.BundleException: Unresolved constraint in bundle jp.example.confluence.plugins.bar [250]: Unable to resolve 250.0: missing requirement [250.0] osgi.wiring.package; (osgi.wiring.package=jp.example.confluence.plugins.foo.component)

まぁ、そりゃそうですよね。

Mediaqueriesの覚え方

いつもこんがらがるので・・・。

min-width

@media only screen and (min-width: 800px) {

「ブラウザが」800px幅が最低でも必要です => 800px以上のブラウザ幅で有効になります。

max-width

@media only screen and (max-width: 800px) {

「ブラウザが」800pxを越える時まで有効です。

minは「最低でも必要」、maxは「この大きさまで有効」